Monday, November 26, 2012

The most important part of your make up: SKIN CARE


I know it's been forever! I've been receiving a lot of questions regarding the things we need to do to improve our skin... This is actually a repost from a few years ago but here it is again. Anyway, on to the purpose of this post: SKIN CARE!

It's important to know that the most CRUCIAL part of your make up is having good skin. Make up looks best with a healthy canvas aka a clear face. It will be so much easier to apply make up because you won't need to apply so much product on your face (therefore not having that too-thick cakey look). You save not only time in applying make up, but you also save money on products you won't be needing. 

NEVER go to bed with your make up on. It's a mortal sin against your skin. Resist the desire to go straight to bed after a long night out, just remember the bacteria that will be accumulating on your face as you sleep. (Hello breakouts!) What's a few minutes of resisting sleep when you can have acne-free, healthier skin in the long run right? All you really need is a cleanser and a moisturizer before going to bed.

Here are some of the products I've tried and tested, I hope they work for you too.  

1. Shiseido Night Repair Moisture Recharge : 
I've been using this product for years, and I LOVE IT. It leaves my skin feeling soft, hydrated, and healthy in the morning.  It's really light when applied, and you only have to use a little of the product which makes it last a few months. I usually use this after cleaning my face with make up remover and a facial wash. Doing this religiously will really help keep your skin healthy and give you a more natural glow.


2. Lancome's GALATÉE CONFORT - Comforting Milky Creme Cleanser:
The make up remover for dry or sensitive skin. If you've experienced redness or flaking after using a remover, it's probably too harsh for your skin. This product actually doubles as a moisturizer and it's so easy to use! All you need is a cotton pad to massage it all over your face, and you don't even have to rinse it off. Although, if you have really thick foundation on I recommend that you use a facial wash after just to make sure you don't leave anything on your face. This can actually also be used even if you're not removing any make up because it also removes impurities that accumulate on your skin throughout the day. Another option is L'oreal's Cleansing Milk. I really don't like using other make up removers because they're too harsh for my skin especially if I use it everyday.


3. PONDS Facial Wash:
No one really needs to overspend on facial wash, but please NEVER use regular soap for your face. Using a facial wash will remove dead skin cells, excess oil and dirt without stripping your face of its natural (and necessary) oils. I've been using PONDS for as long as I can remember and it's been doing its job pretty well for a really affordable price.


HOWEVER, the best skincare tip I can give you doesn't cost a thing: Rest, diet, and exercise. Our skin is an organ as well and it reflects what we eat, drink, how often we exercise, how much hours of sleep we have and how we feel. Keep your skin happy! Drink a lot of water, avoid smoking and drinking alcohol (they speed up aging and cause wrinkles), and eat healthy. Exercise. Sleep. Avoid stress. There's no skincare or make up product that can substitute what these can do for you. 

I hope this helps! Happy Tuesday!

Tuesday, August 21, 2012

Dark Vampy Lips


There's something about vampy lips this season, and if you liked Camila Belle's look at the MET Ball, I have a few tips that can help you achieve her lips ;)

You can use L'oreal's Color Riche Lipstick in Intense Plum. I also used Nars' lip liner in Train Bleau, to darken the lips even more. Remember to put the lip liner first, then lipstick. Make sure to blend the liner and the lipstick, to remove any hard edges. 


It's a deep burgundy color that will really help you get those dark vampy lips. 

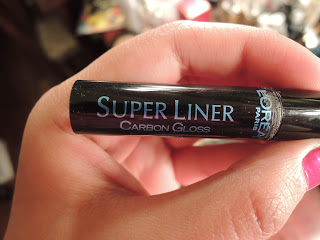
For this look, I just used L'oreal's Eyeshadow in Beige Harmony and L'oreal's Super  Carbon Liner plus heavy mascara to keep everything simple. A little contouring and highlighting  also helped enhance my non-existent cheek bones. Haha.


With Camilla Belle, she just had strong brows, mascara, dark contours,  shimmer, highlighting, and really simple eye make up. 
REMEMBER: The lips must get ALL the attention. 


Saturday, August 11, 2012

L'oreal's Newest Collection : Miss Candy

I just received four brand new lipsticks from L'oreal's newest collection, Miss Candy! 


I'm going to review all four of them in this post: Miss Strawberry, Miss Marshmallow, Miss Orange and Miss Raspberry. :) These lipsticks are so perfect for everyday, because they're really light on your lips. It's just like wearing lip balm.


 I love them because they smell SO good -- like candy (obviously....haha) Plus, their colors are really pastel bright! Really young and refreshing compared to the usual colors we have available in the market.

(From L-R: Miss Marshmallow, Miss Raspberry, Miss Orange and Miss Strawberry)


All of them are subtle in color, having a lip gloss-feel to them which makes it perfect for those days you just want to have a hint of color on your lips. :)

Miss Marshmallow


Miss Raspberry

Miss Orange


Miss Strawberry


My personal favorite is Miss Marshmallow, because it's semi-nude/pink and wearable for both day and night.

Watch out for these lipsticks this August! :D Can't wait for all of you to try them! :D Make sure to visit your nearest L'oreal Paris counter!

I'll be doing make overs in the L'oreal Counter in Robinsons Galleria (August 31). Please do visit for a FREE makeover! :D

Thursday, July 19, 2012

MUST-HAVES FOR EVERY BASIC MAKE UP KIT


When you're just starting to get to know make up, the hardest part of it really is, "What should I buy?" I'm sure you've experienced buying make up from a store and coming home thinking, so....how do I use his again??? And you end up never using it. There are so many products that you can purchase in the market and I know how confusing that can get! 

In this post, I'm going to give you the 10 things every girl needs in her everyday make up kit. These are the most BASIC make up products so make sure you have these before falling for those other products you don't really need but can explore later on. These products will help you achieve flawless make up for your everyday looks, whether you're going to school, work, or going for a night out with friends.


1. Powder Foundation - Every girl needs a powder to look fresh all day. Even if your skin is flawless, you'll need it. It will help seal in your make up making it last longer plus avoiding that shiny and oily look (yuck!) you get after hours of being out and about! (You can opt to add liquid foundation to your kit if you want heavier coverage)

2. Concealer - We all wish we had no acne, no sun spots, no blemishes whatsoever, and no dark circles. Unfortunately, even the most perfect of complexions still need a little concealing here and there. Conceal your blemishes and make sure to set it with powder ;)


3. Blush - Apply a pinkish blush on the apples of your cheeks, just to add some color into your face. Make sure you blend to make it a natural flushed look.


4. Lipsticks - I recommend every girl to have and wear lipstick. If you're not a fan, stick to colors close to your lip color. I recommend having at least a pink, red, and a natural shade in your kit. Even if your eye make up is simple, a nice lipstick can immediately make a statement! 


5. Eyeshadow Palette in Earth Tones - Browns and Pinks flatter almost every girl's skin tone. It's amazing how a little eyeshadow can make a difference in our sleepy, tired eyes. You don't have to be an expert in applying eyeshadow, just don't use too many colors if you're still practicing! One shade will do for a beginner, just to open up your eyes. (I'm due for an eye shadow tutorial, soon I promise!)


6. Eyeliner in Black and Brown - Eyeliners instantly make your eyes open and look more defined with eyeliner! It doesn't matter what kind you use -- pencil, gel, or liquid. Don't skip this. It makes a HUGE difference.


7. Eyelash Curler - Open up your eyes even more by curling your lashes. It makes you look more feminine and your eyes look extra flirty. You won't regret it!


8. Black Waterproof Mascara - Of course, after curling your lashes, apply mascara! I recommend it to be waterproof because we don't want it sliding and smudging throughout the day. You can turn  your work make up into night make up and trust me, IT WILL STAY ON.


9. Eyebrow Pencil - Groomed eyebrows, as I've said in my previous posts, frame your face and give you a more polished and glamorous look. If you don't care to look at your eyebrows, other people do. And it will unfortunately make your face look untidy especially if you have a lot of stray hair so please, keep your brows neat :)


10. Moisturizer with SPF - I know this isn't counted as make up, but I believe that nice make up starts with good looking skin. Apply moisturizer religiously, before applyting make up in the morning and before going to sleep. I assure you that you will definitely see good results in your skin after a few weeks. :)


EXTRA TOOLS/ESSENTIALS FOR YOUR MAKE UP KIT: (these are some of the tools I feel you need in applying the products above, for a more flawless and polished look)


1. A Fluffy Powder/Blush Brush - Use it in applying your face powder and your blush, to make the coverage even throughout your face. I prefer brushes over sponges because sometimes sponges lay it on too thick for my liking.


2. Eyeshadow Brush - I personally never liked those small applicators that come with eye shadow palettes. One, it's difficult to blend your eye shadow with it. Two, they get lost or they get ruined after a few weeks of regular use. This is why I recommend a brush. Blending is a must in eye shadow.


I hope this guide helps you start your make up kit! :) Feel free to comment! :)

Tuesday, July 17, 2012

HOW TO: Winged Eyeliner with L'oreal Super Liner

photo from polyvore.com


This is my favorite make up look for myself. It's easy, quick and I barely have to apply any eyeshadow. The eyeliner should speak for itself.

I know it looks harder than it actually is, but trust me that it really is easy.

I usually use a liquid liner (the finer the tip, the easier to do it) or a gel liner with an angled brush. It's difficult to achieve the perfect "wing" with a pencil, because you can't control how thick/thin the pencil liner goes on. For this particular look, I used L'oreal's Super Carbon Liner. It has a fine tip and you're good to go with one swipe.


Step one:

Just apply your eyeliner as you usually do on your whole upper lash line.


Step two:

Following the natural slant of your eye, draw a line depending on how high or long you want your wing to be.


Step three:

From the tip of your line, just fill in the wing going towards your lash line, making a slanted triangular shape.This will give it a more pointy tip.


And you're done! Hope this helps! Please leave a comment if you have any questions :)


TIP: 
For a more wide-eyed look, I placed false eyelashes and white eyeliner on my lower waterline :)


Sunday, June 24, 2012

Red Lipstick : It's just not going anywhere

I have to admit that back when I was younger, I would DIE if I had to wear red lipstick. I found it too old and just not me.

Oh, was I so wrong.

After working at M.A.C, playing around with the shades of red lipsticks they had, I finally found my match. The shade, the texture, I absolutely LOVED it. Now, I can wear red lipstick even if it's before noon.

I know wearing red lipstick can be intimidating. It really is, actually. But we have to admit that red lipstick is going to be around for life. I guess being able to carry red lipstick radiates a different confidence and adds instant glamour to your day-to-day look. Also, finding the perfect red shade instantly brightens your face without the extra effort.


My personal favorite is M.A.C's Viva Glam 1. I recommend keeping your eye make up simple especially if you want to go all out with your lips. :)

I just used THE BODY SHOP's Shimmer Waves for my eyes and for my cheeks! It's perfect for  keeping your make up light and simple :)
I suggest visiting a make up counter and checking which red brightens your face. It helps if you know your skin's undertone whether it's cool or warm. :)

Have fun looking for your perfect red lipstick! :)

Saturday, June 23, 2012

How to apply Mascara :)

As simple as it sounds, not everybody knows how to apply mascara. I used to think I didn't really need to apply mascara because I didn't think it made a difference. I was wrong. It really helps in opening up my eyes and helps me to look more fresh and awake, especially if i'm not wearing eyeliner.

I know what you're thinking...how complicated can mascara be, right? Don't you just swipe the wand on your lashes and you're good to go? No, not really. Haha! There are a few tips that you can do so that your lashes look natural and curled the whole day. Whether you're using something pricey or whatever, these steps should help you out :)

Step One:
CURL. Unless you're one of those lucky girls who have naturally think and curled lashes, always curl before applying mascara. Just squeeze your curler close to the base of your lashes going outward. This helps make the curl look natural. I notice a lot curl their lashes after applying mascara! That's a big no no! This destroys your lashes and may break/pull them. :( 


Step Two:
Apply mascara at the base of your lashes first in a zigzag motion, depositing most of the product there. It helps make your lashes fuller and serves as the base of the mascara so that it'll stay curled all day.


TIP: Use waterproof mascara (especially if you're going for a night out or for a day at work!) This makes it sweat-proof, long-wearing and you won't need to worry about having raccoon eyes by the end of the night.


Step Three:
Apply minimum mascara towards the tips of your lashes. Don't lay it on too think because when the tips are too heavy, your lashes will droop instantly. Make sure you don't pump your wand into the tube to "get more product". This causes air to enter which makes it dry out faster. Make sure there are no clumps! :)


Aside from mascara, I'm just wearing concealer, powder, blush and groomed my brows a bit. :) However, you can apply eyeliner and mascara at the bottom if you're going for a little more drama. :)

Hope this helps :)